前言
本文主要面向前端和 Node.js 研发团队,介绍如何将 CR 经验更高效地转换成 ESLint 规则集,以提升团队研发质量下限。以下是探讨的内容:
- 如何写:使用 ChatGPT 生成 ESLint 规则,并通过 snapshot 测试用例快照提升规则的鲁棒性
- 如何配:搭建 ESLint 工程(主要以 Monorepo),根据不同应用规则集需求,在 precommit 和 CI 阶段对增量代码做检测
本文演示的代码见:ycjcl868/monorepo#15、#16
背景
ESLint 是一个广泛使用的 JavaScript 代码检查工具,可帮助团队确保代码质量和一致性。然而,ESLint 默认的规则集可能并不符合各团队的具体需求,因此,定制化 ESLint 规则集对于团队高效协作研发是较为常见的需求。
痛点
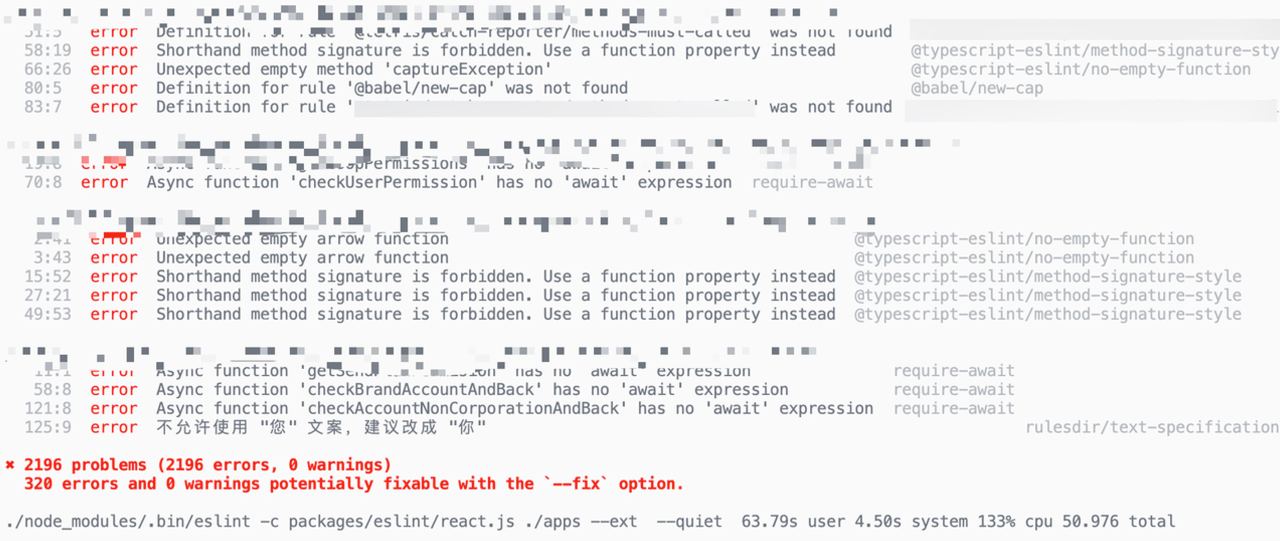
在研发过程中,使用过 ESLint 的团队通常会遇到以下几个痛点问题:
- 祖传代码改不动:接手项目代码时,大部分没有配备 ESLint,为了符合规则,修改祖传代码的风险极高!
- 无效规则集较多:实践中,有很多规则过于严格(例如 no-throw-literal、dot-notation 等)
- 规则定制困难:众口难调,每个团队的代码风格都不同,完全按照业界/公司的代码规范会让团队非常痛苦,而编写一个 ESLint 规则需要与 AST 斗智斗勇。
效果
以上痛点的解法大概是:
- 增量检测:只对当前变更的代码进行 ESLint 检测
- 取其精华:在公司代码规范基础上,关闭无效的规则,只开启**『一定会出错』**的规则
- 利用 ChatGPT:生成式 AI 最适合做这类事,99% 的规则都可以由 ChatGPT 生成的
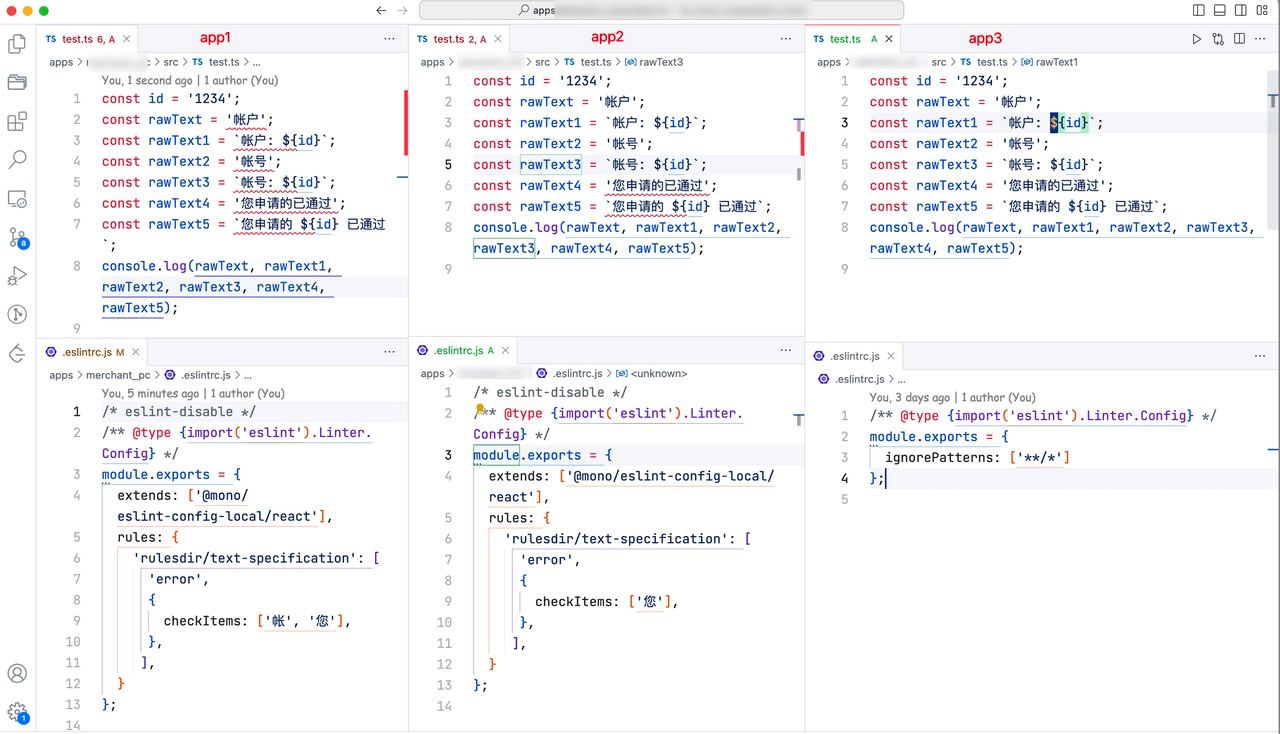
- React JSX 中不允许 number 数字类型直接和 &&(逻辑和) 使用
- 不允许使用”登陆”,建议改成”登录”
- 不允许使用 new Date()、Date(),建议使用 dayjs()
- “帐号” and “账户”
最终,每个项目都可以定制规则,并按增量执行检测。如果 CI 检测未通过,则会给出修复命令,如下图所示:
如何写?
ChatGPT
最初,直接使用 ChatGPT 在对话中生成规则。后来,发现可以通过固定 prompt,提供『规则描述』、『正确代码示例』和『错误代码示例』三个参数,让 AI 自动生成规则。
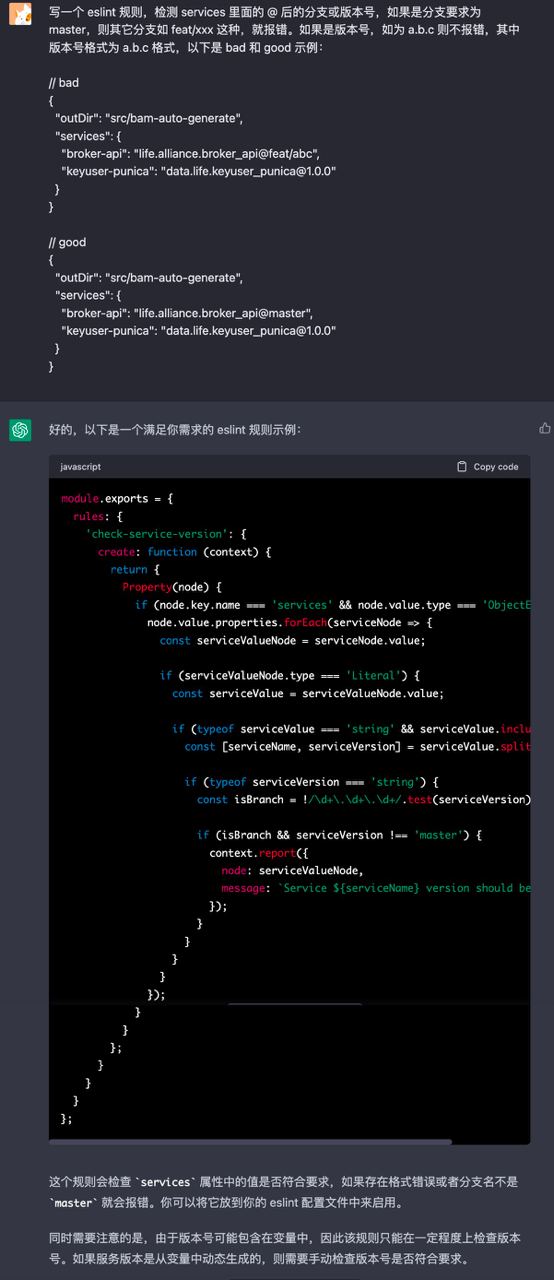
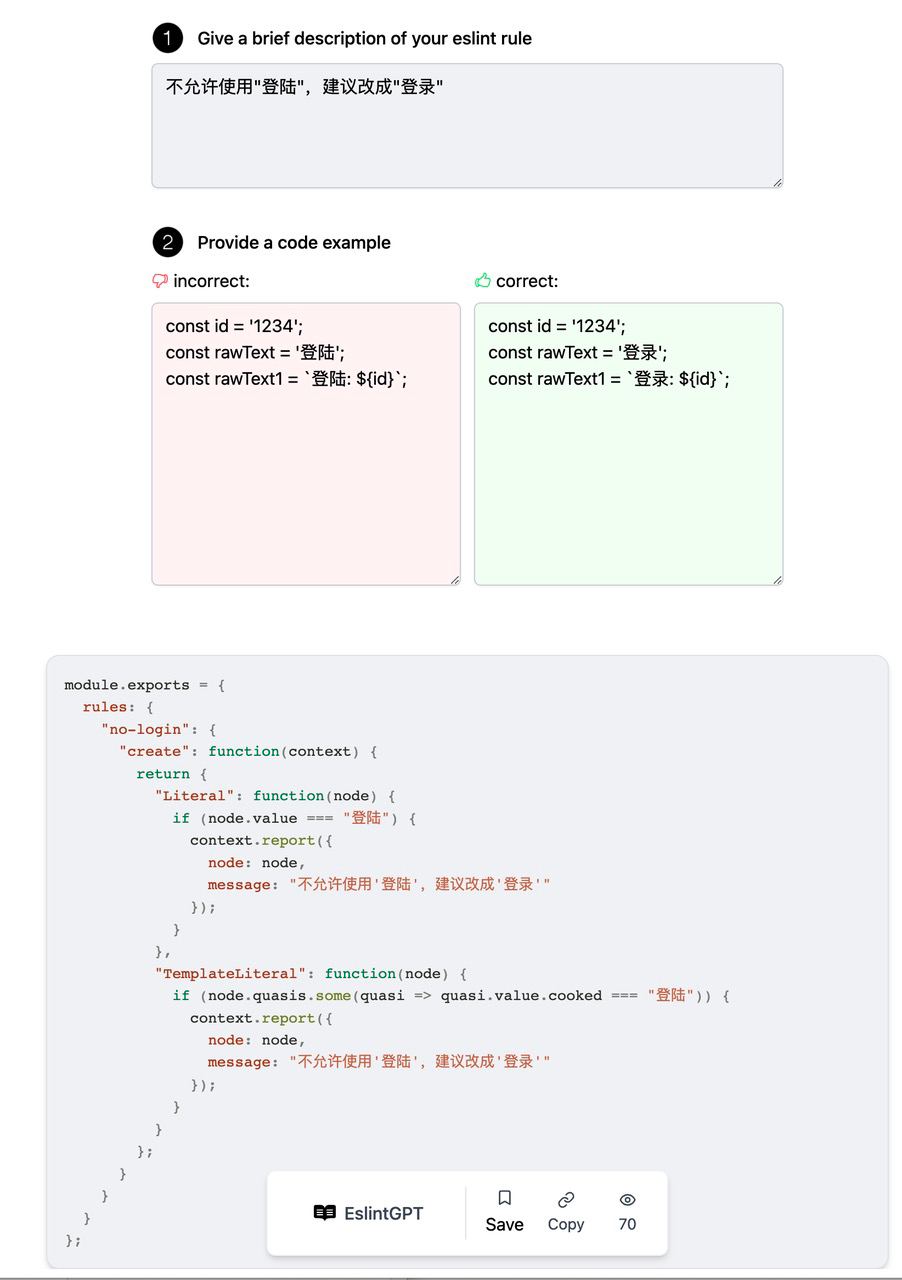
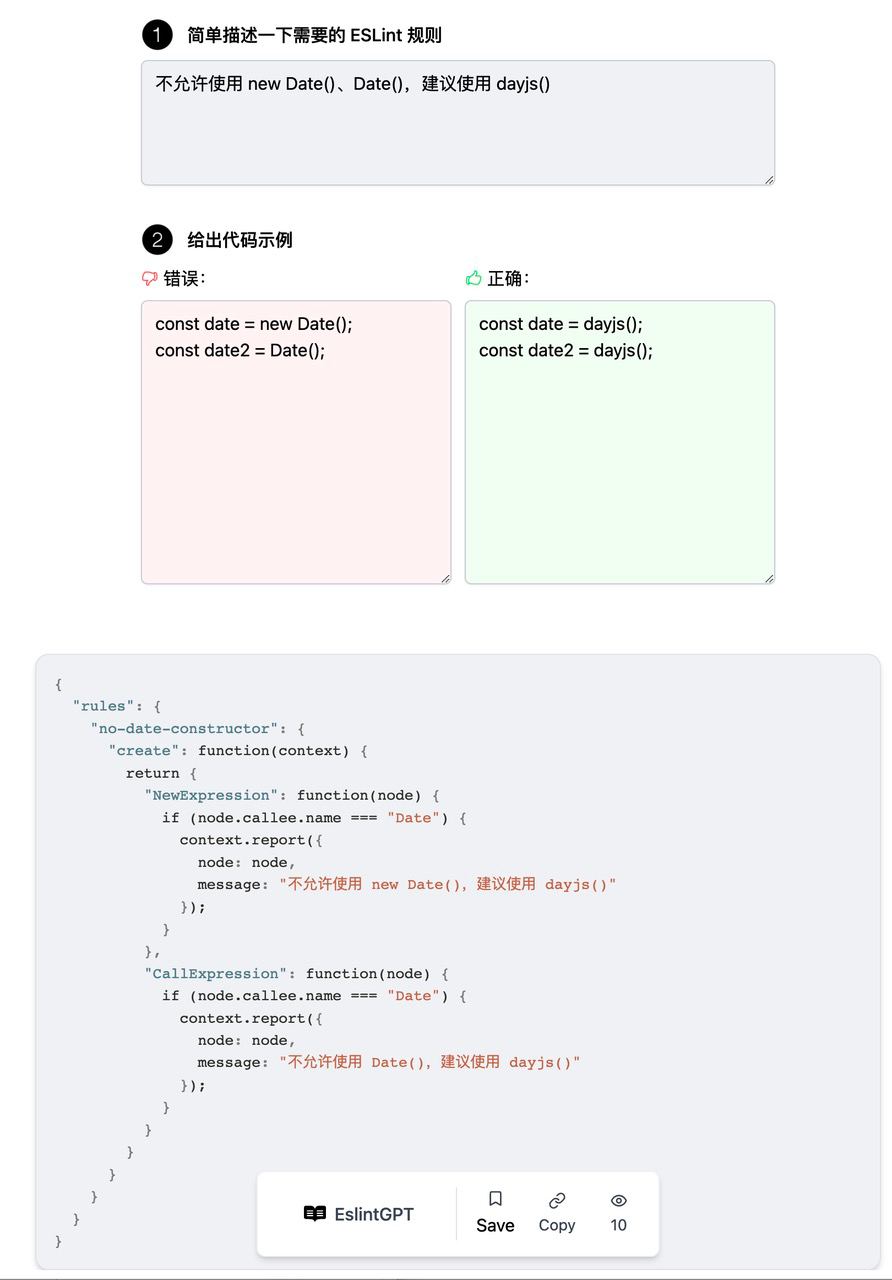 Prompt 使用的是(抛砖引玉,大家有更好的 Prompt 可以交流):
请帮我写一个 eslint 规则,只需要给出规则代码,规则要求:{description}。规则校验正确代码通过,错误代码不通过,以下是正确和错误代码示例:\n\n// 正确\n``js\n{correct_code}\n```\n\n// 错误\n``js\n{incorrect_code}\n``。手工
ChatGPT 生成的规则也不是银弹,目前发现没法写 TS 相关的规则,所以这部分只能借助 @typescript-eslint/utils 工具来手写 AST。 新建一个规则文件
packages/eslint/rules/{新规则}.js,借助 AST Explorer 、TS ESLint 等工具编写规则:
/** @type {import('eslint').Rule.RuleModule} */module.exports = { meta: { type: 'problem', docs: { description: '', category: 'Best Practices', recommended: true, }, }, create: function (context) { return { // AST 部分编写细节及 API 见:https://eslint.org/docs/latest/extend/custom-rules }; },};TS 类型判断
这里举一个很有用的规则:React JSX 中不允许 number 数字类型直接和 &&(逻辑和) 使用,经常会出现页面直接渲染了 0,而不是 hello
const Home = (props: { gender: number; text: string; obj: { gender: number } }) => {  const { gender, text } = props;  return (    <div>      {gender && <p>Hello</p>}      {props?.obj?.gender && <p>Hello</p>}      {foo() && <p>Hello</p>}      {text && <p>Hello</p>}    </div>  );};
function foo(): number {  return 0;}
这个规则需要借助 typescript-eslint 来写, 解析成 TSEsTree AST 抽象语法树,最终的规则代码如下:
如何测?
快照测试用例
ESLint 官方推荐写规则测试用例通过 RuleTester,但是这无疑增加了规则用例的复杂度,同时还需要处理有效和无效代码的格式。
const RuleTester = require('eslint').RuleTesterconst rule = require('../rules/text-specification')
const tester = new RuleTester({  parser: ...,  parserOptions: { ecmaVersion: 2015 }  ...一堆配置})
tester.run('text-specification', rule, {  valid: [    {      filename: 'test.js',      code: `const a = "账号";\nconst b = "账户"\n`    }  ],  invalid: [    {      filename: 'test.js',      code: `const a = "帐号";\nconst b = "帐户"\n`    }  ],}
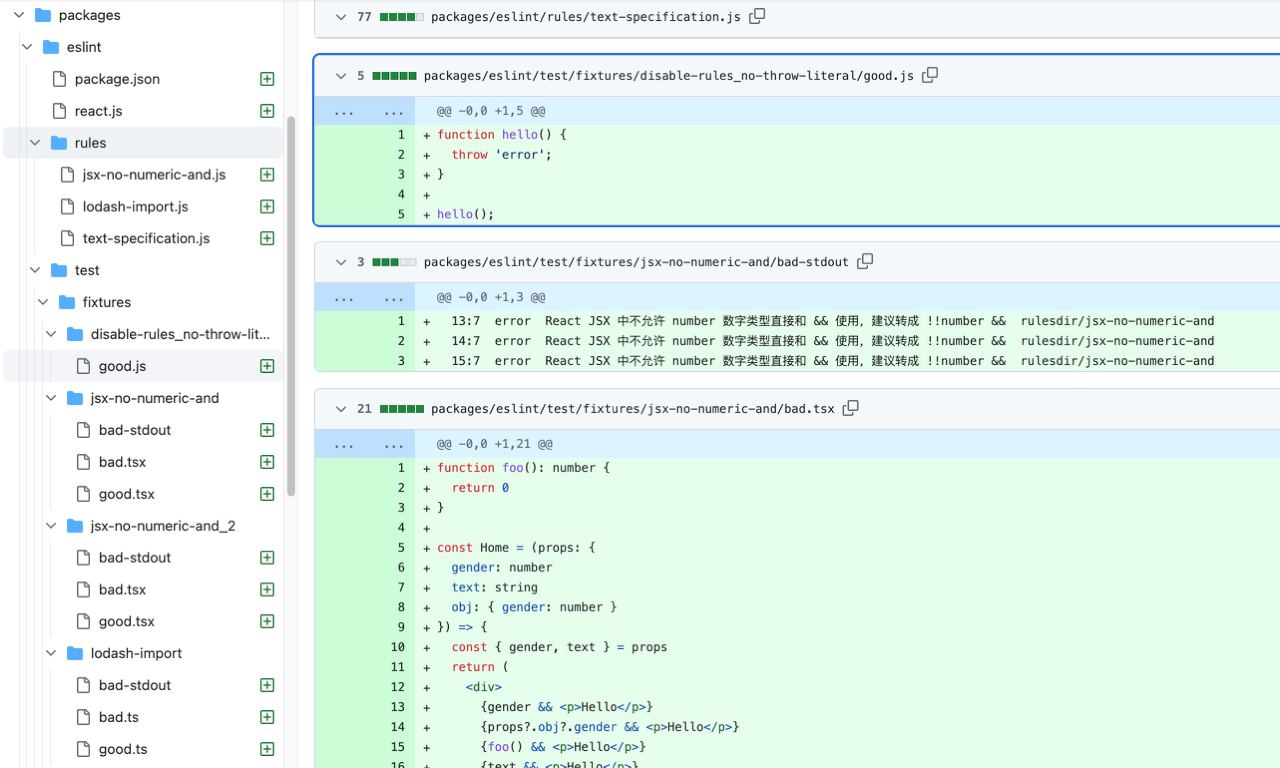
这里以使用者视角,用更简单的快照方式,规则开发者只需要补 good、bad、bad-stdout 三个快照即完成测试用例:
// test/text-specification/good?.(tsx|jsx|js|jsx)
const id = '1234';const rawText = '账户';const rawText1 = `账户: ${id}`;console.log(rawText, rawText1);// test/text-specification/bad.(tsx|jsx|js|jsx)
const id = '1234';const rawText = '帐户';const rawText1 = `帐户: ${id}`;console.log(rawText, rawText1);2:17 error 不允许使用 "帐户" 文案,建议改成 "账户" rulesdir/text-specification3:18 error 不允许使用 "帐户" 文案,建议改成 "账户" rulesdir/text-specification执行测试用例:
$ vitest run -t text-specification
 ❯ test/index.test.ts (12)   ↓ eslint react('disable-rules_no-throw-literal') (2) [skipped]   ✓ eslint react('talent_text-specification') (2) 1636ms   ❯ eslint react('talent_text-specification_2') (2)     ✓ 'good' 796ms     ⠏ 'bad'   · eslint react('talent_text-specification_3') (2)   ...
有了快照用例后,可以让规则自身功能更健壮:
如何配?
这里我们以单仓 Monorepo 为例,配置 ESLint 规则集,多仓配置方式和单仓中的单个目录规则一致。
目录结构图
主要在两部分:
- 全量 ESLint 规则集 npm 包:这里用
packages/eslint,包名为@infras/eslint-config-local - 应用
apps/,对 ESLint 的需求中一般有三类:- 使用默认规则
app1 - 规则定制
app2:主要是开启一些规则 - 关闭/不使用 lint
app3:不再迭代的废弃应用,不希望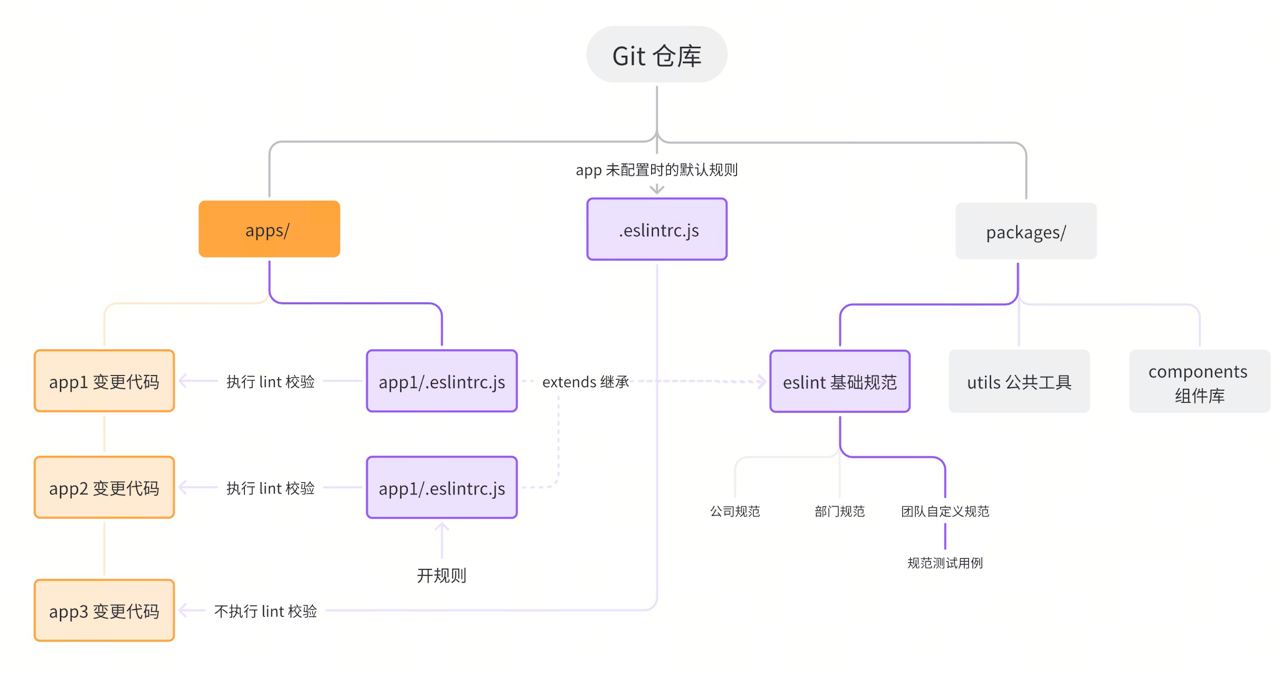
- 使用默认规则
ESLint 规则集 npm 本地包
eslint 规则集是经常快速变化的,不建议通过发包形式使用,而是以本地包方式使用
packages/eslintnpm 包目录结构如下:
- rules - {定制的规则1}.js - {定制的规则2}.js- react.js- node.js- package.json- test - fixtures // 快照测试用例 - {定制的规则1} - good - bad - bad-stdout - config.jspackage.json
先看下 package.json,主要是在公司前端代码规范基础上进行定制:
{ "name": "@infras/eslint-config-local", "private":true, "dependencies": { "@rushstack/eslint-patch": "^1.2.0", "@eslint-community/eslint-utils": "^4.4.0", "@typescript-eslint/utils": "^5.58.0", "eslint-plugin-rulesdir": "^0.2.2", // 可以在本地目录中写 eslint 规则 "@typescript-eslint/parser": "^5.47.0", "typescript": "^4.9.5" }, "devDependencies": { "eslint": "^7.32.0", "@types/node": "^14.0.14", "glob": "^10.0.0", "vitest": "^0.29.7", "tsutils": "^3.21.0" }, "scripts": { "dev": "vitest", "test": "vitest run" }, "peerDependencies": { "eslint": "*" }}name 包名一定要以
eslint-config-*结尾,不然使用时无法继承 #creating-a-shareable-config
规则集 react.js
再看下 React 应用的全量规则集 react.js(若有其它类型补充对应规则集文件即可,例如vue.js、 node.js、electron.js)
// 解决找不到依赖问题require('@rushstack/eslint-patch/modern-module-resolution')
const path = require('path');const rulesDirPlugin =require('eslint-plugin-rulesdir');rulesDirPlugin.RULES_DIR = path.join(__dirname,'rules');
/** @type {import('eslint').Linter.Config} */module.exports = {  root: true,  extends: ['公司代码规范'],  plugins: ['rulesdir'],  parser: '@typescript-eslint/parser',  parserOptions: {    ecmaVersion: 11,    sourceType: 'module',    ecmaFeatures: {      jsx: true,      legacyDecorators: true    },    project: './tsconfig.json'  },  rules: {    // 自定义规则    'rulesdir/text-specification': 'error',    'rulesdir/jsx-no-numeric-and': 'error',    'rulesdir/lodash-import': 'error'    ...  },};
其中:
- 关闭
prettier代码风格规则,让 eslint 只专注做错误代码校验 - 以
rulesdir/*开头的规则属于团队定制(如何写见后文),使用原生 JS 文件(不用编译规则立即生效):rules/text-specification.js:文案校验rules/jsx-no-numeric-and:避免出现0 && <div />展示 0 的问题rules/lodash-import:前端项目优先使用lodash-es而非lodash
这里关掉了不少『公司级代码规范』规则,原则是只使用『能拦截有效错误的规则』
应用中使用
都是在 apps/*/package.json 中添加 eslint 规则集 npm 依赖
"devDependencies": { "@infra/eslint-config-local": "workspace:*",}使用默认规则
在 apps/{子应用}里新建 .eslintrc.js :
/* eslint-disable *//** @type {import('eslint').Linter.Config} */module.exports = { extends: ['@infra/eslint-config-local/react']};规则开关
在 apps/{子应用}里新建 .eslintrc.js ,在 rules 里对具体规则进行 开/关、配置:
/* eslint-disable *//** @type {import('eslint').Linter.Config} */module.exports = { extends: ['@infra/eslint-config-local/react'], rules: { "rulesdir/text-specification": ["error", { checkItems: ['帐'], // 根据需要 }] },};所有 ESLint 规则都放到 packages/eslint 里面,应用使用时只做规则开/关
完全关闭/不使用 lint
不新建 apps/{子应用}/.eslintrc.js ,这时候会使用根目录下的 .eslintrc.js 规则(即ignorePatterns 忽略所有文件检测):
/* eslint-disable *//** @type {import('eslint').Linter.Config} */module.exports = { ignorePatterns: ['**/*']};工程化
为了系统性严格执行 ESLint 规则,这里在两个阶段对增量代码进行 eslint 检测:
- Git 提交前:在本地对变更的代码执行 eslint 检测
- CI MR 环节:对当前 MR 中的代码做检测(主要防止通过
git commit -n方式绕过本地检测)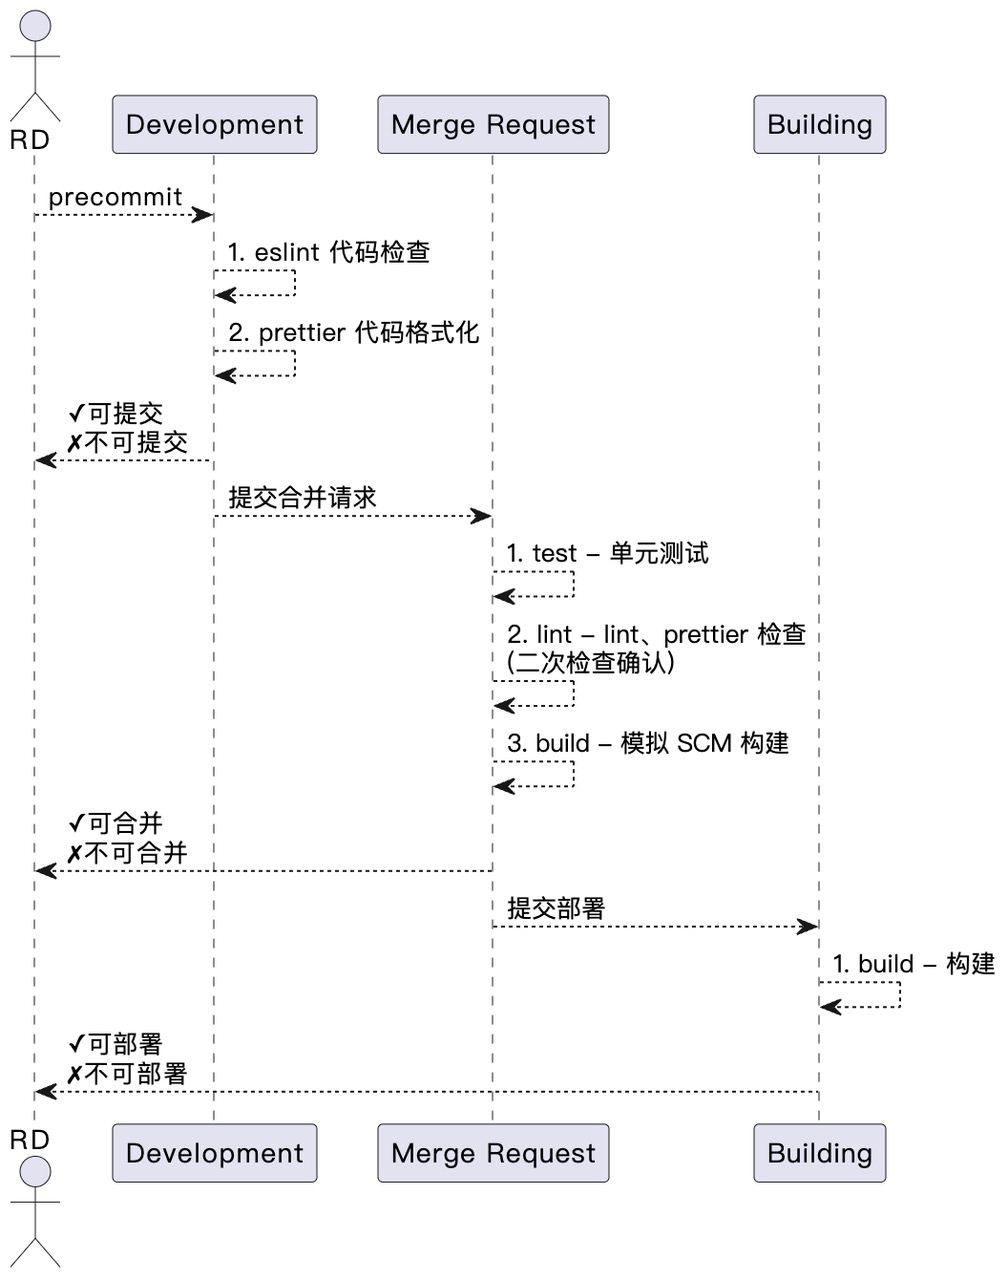
Git 提交(precommit)
这里使用较成熟的 husky + lint-staged,主要改动:
- 根目录
package.json
{ "name": "name", "version": "0.0.1", "devDependencies": { "eslint": "^7.32.0", "husky": "^8.0.3", "lint-staged": "^13.2.0" }}- 执行 husky 安装
$ npx husky install$ npx husky add .husky/pre-commit "npx lint-staged"- 配置根目录的
.lintstagedrc.json需执行的校验命令
{ "**/*.{js,ts,jsx,tsx}": [ "./node_modules/.bin/eslint --no-error-on-unmatched-pattern", "./node_modules/.bin/prettier --write" ]}这样每次 git commit 时就会执行规则检测:
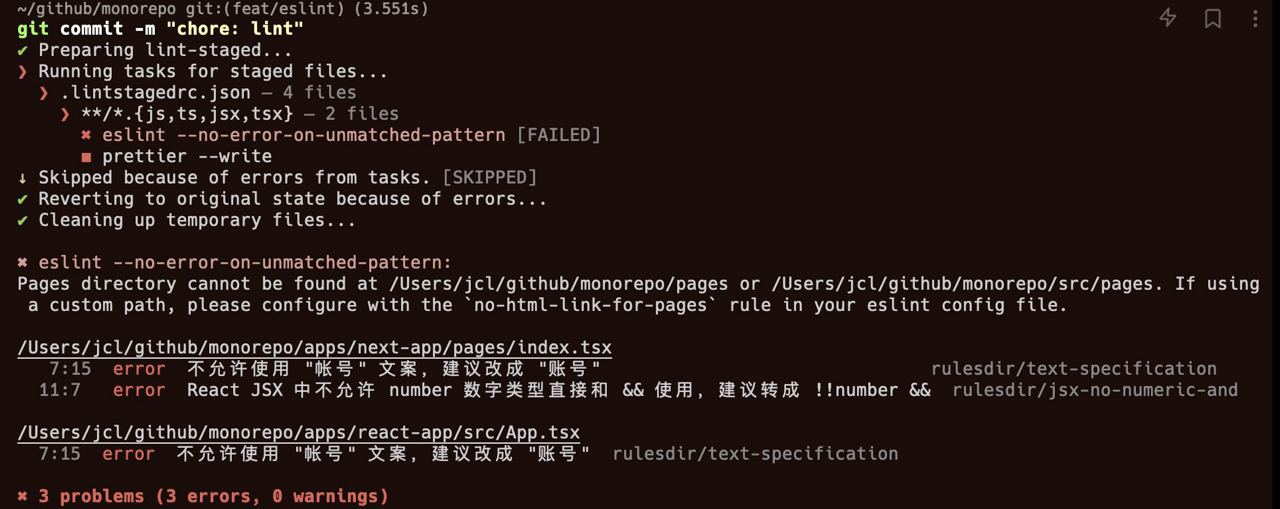
CI
CI 为了提高 CR 效率,CI 不过 不 CR,其中 CI 配置有一些优化点:
- 使用
git diff将 MR 中变更文件筛选出来做增量检测 - Lint CI 单独配置,这样可以更快执行 lint,给开发者更快地反馈(一次 push 大概 1min 内就可以知道校验结果)
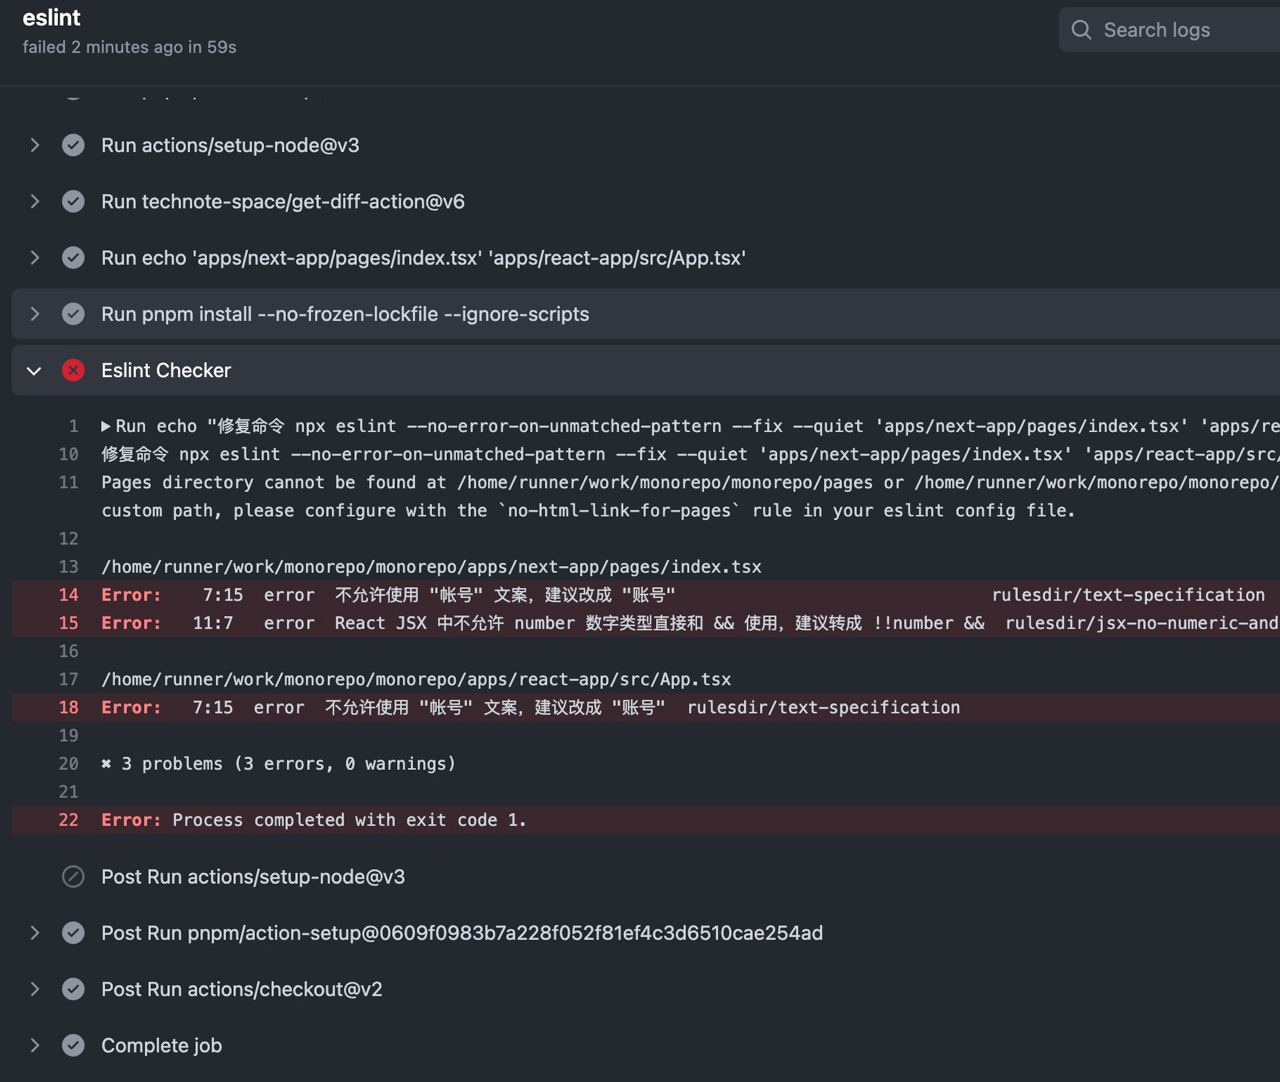 完整配置如下:
name: Lint stagedon: [push]jobs: eslint: runs-on: ubuntu-latest steps: - uses: actions/checkout@v2 - name: install pnpm shell: bash run: | PNPM_VER=$(jq -r '.packageManager | if .[0:5] == "pnpm@" then .[5:] else "packageManager in package.json does not start with pnpm@\n" | halt_error(1) end' package.json) echo installing pnpm version $PNPM_VER npm i -g pnpm@$PNPM_VER - uses: technote-space/get-diff-action@v6 with: PATTERNS: | apps/**/*.+(ts|tsx|jsx|js) .github/workflows/lint.yml - uses: actions/setup-node@v3 if: env.GIT_DIFF with: node-version: '18' cache: 'pnpm' cache-dependency-path: '**/pnpm-lock.yaml' - run: echo ${{ env.GIT_DIFF }} - run: pnpm install --ignore-scripts if: env.GIT_DIFF - name: Eslint Checker if: env.GIT_DIFF run: | echo "修复命令 npx eslint --no-error-on-unmatched-pattern --fix --quiet ${{ env.GIT_DIFF_FILTERED }}" pnpm eslint --no-error-on-unmatched-pattern --quiet ${{ env.GIT_DIFF_FILTERED }}一些感受
- 只有团队定制的 eslint 规则才有较高价值
- **99% **的规则应该由 AIGC(人工智能生成内容) 来完成